목차
8-1. 표준입출력
8-2. 다양한 출력포맷
8-3. 파일입출력
8-4. pickle
8-5. with
8-6. 퀴즈 #7
9-1. 클래스
9-2. __init__
9-3. 맴버변수
9-4. 메소드
9-5. 상속
9-6. 다중상속
9-7. 메소드 오버라이딩
9-8. pass
9-9. super
9-10. 스타크래프트 프로젝트 전반전 / 9-11. 스타크래프트 프로젝트 후반전
9-12. 퀴즈 #8
10-1. 예외처리
10-2. 에러 발생시키기
10-3. 사용자 정의 예외처리
10-4. finally
10-5. 퀴즈 #9
11-1. 모듈
11-2. 패키지
11-3. __all__
11-4. 모듈 직접 실행
11-5. 패키지,모듈 위치
11-6. pip install
11-7. 내장함수
11-8. 외장함수
11-9. 퀴즈 #10
8-1. 표준입출력
print("Python" + "Java") > 출력시 : PythonJava (붙어서 나옴)
print("Python", "Java") > 출력시 : Python Java (떨어져서 나옴)
print("Python", "Java", sep=",") > 출력시 Python 과 Java 사이에 ,를 넣어서 Python,Java 라고 나옵니다.
print("Python", "Java",sep=",",end="?") >Python,Java?무엇일까요 라고 나온다.
print("무엇일까요?")
end=는 이문장의 끝부분을 내가 정하고싶은걸로 바꿔달라는 뜻 인데,
end가 원래 무조건 줄바꿈을 하게끔 되어있는데,
end 에 "?"를 넣으면 문장이 바로 연달아서 한 문장으로 출력됩니다.
ljust() -> 왼쪽 정렬 하고 ()안의 값만큼 공간을 확보
rjust() -> 오른쪽 정렬 하고 ()안의 값만큼 공간을 확보
zfill() -> 앞에 자릿수를 더 만든다
한마디로. 1,2,3,4,5 를 만약 001로 바꾸고싶으면 변수이름.zfill(3)으로 만들면 001로 나온다는 뜻입니다.
사용자 입력을 통해서 값을 받게되면 항상 문자열로 저장됩니다.
print("Python" + "Java")
print("Python", "Java")

print("Python", "Java", sep=",")
print("Python", "Java",sep=",",end="?")
print("무엇일까요?")

scores = {"수학":0, "영어":50, "코딩":100}
for subject, score in scores.items():
    print(subject.ljust(8),str(score).rjust(4), sep=":")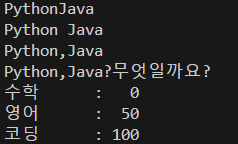
8-2. 다양한 출력 포맷
빈 자리는 빈공간으로 두고, 오른쪽 정렬을 하되, 총 10자리 공간을 확보
print("{0: >10}".format(500))
양수일 땐 +로 표시, 음수일 떈 -로 표시
print("{0: >+10}".format(500))
print("{0: >+10}".format(-500))
왼쪽 정렬하고, 빈칸으로 _로 채움
print("{0:_<+10}".format(500))
자리 마다 콤마를 찍어주기
print("{0:,}".format(100000000))
3자리 마다 콤마를 찍어주기, +- 부호도 붙이기
print("{0:+,}".format(100000000))
print("{0:+,}".format(-100000000))
빈곳은 ^로 채우고,왼쪽정렬,30칸으로 설정 3자리 마다 ,찍기
print("{0:^<+30,}".format(100000000))
소수점 출력
print("{0:f}".format(5/3))
소수점 특정 자리수 까지만 표시
print("{0:.2f}".format(5/3))
# 빈 곳은 빈공간으로 두고, 오른쪽 정렬, 총 10자리 공간 확보
print("{0: >10}".format(500))
# 양수 : + 음수 : -
print("{0: >+10}".format(500))
print("{0: >+10}".format(-500))
# 왼쪽 정렬, 빈칸을 _로 채움
print("{0:_<+10}".format(500))
# 자리마다 콤마를 찍기
print("{0:,}".format(100000000))

# 3자리 마다 콤마를 찍고 + - 부호도 붙이기
print("{0:+,}".format(100000000))
print("{0:+,}".format(-100000000))

# 빈 곳은 ^로 채우고 왼쪽정렬, 30칸으로 설정 3자리 마다 ,찍기
print("{0:^<+30,}".format(100000000))

# 소수점 출력
print("{0:f}".format(5/3))
# 소수점 특정 자리수(2자리수) 까지만 표시
print("{0:.2f}".format(5/3))
8-3. 파일입출력
파이썬을 통해서 파일을 열어서 안에 있던 내용을 불러올수도 있고, 쓸수도 있습니다.
파일을 열때는
score_file = open("score.txt", "w", encoding="utf8")
"w" : 쓰기 전용
"a" : 이어서 쓰기
"r" : 읽기전용
score_file이라는 파일을 여는데 파일이은 "score_file.txt"고, "w"는 쓰기전용,
인코딩 정보는 "utf8" 이걸 안해주면 한글이 깨져서 나올 수도 있습니다.
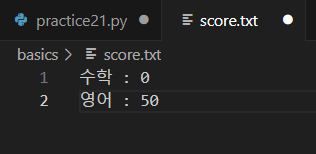
print("수학 : 0", file=score_file)
"수학 : 0" 이라는 정보를 score_file에 써주기
print("영어 : 50", file=score_file)
"영어 : 50"이라는 정보를 score_file에 써주기
score_file.close() > 항상 파일을 열었으면 닫아주는것 까지 해줘야합니다.
score_file = open("score.txt", "w", encoding="utf8")
print("수학 : 0", file=score_file)
print("영어 : 50", file=score_file)
score_file.close()

score_file = open("score.txt", "a", encoding="utf8")
score_file.write("과학 : 80")
score_file.write("\n코딩 : 100")
score_file.close()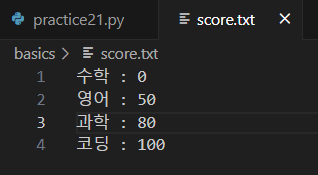
score_file = open("score.txt", "r", encoding="utf8")
print(score_file.read())
score_file.close()
score_file = open("score.txt", "r", encoding="utf8")
print(score_file.readline(), end="")
print(score_file.readline(), end="")
print(score_file.readline(), end="")
print(score_file.readline(), end="")
score_file.close()score_file = open("score.txt", "r", encoding="utf8")
while True: # while 반복문을 사용해서 출력하기
line = score_file.readline()
if not line:
break
print(line, end="")
score_file.close()score_file = open("score.txt", "r", encoding="utf8")
lines = score_file.readlines() # list 형태로 저장
for line in lines:
print(line, end="")
8-4. pickle

피클이란 프로그램상에서 사용하고 있는 데이터를
파일 형태로 저장해주는 것 입니다.
피클을 사용하려면
import pickle 를 코드에 작성해야합니다.
import pickle
profile_file = open("profile.pickle", "wb")
profile = {"이름":"박명수","나이":30,"취미":["축구","골프","코딩"]}
print(profile)
pickle.dump(profile, profile_file) # profile에 있는 정보를 file에 저장
profile_file.close()
profile_file = open("profile.pickle", "rb")
profile = pickle.load(profile_file) # file에 있는 정보를 profile에 불러오기
print(profile)
profile_file.close()
8-5. with
with 는 위에서 배웠던 파일을 열고,어떤 처리를 하고 파일을 닫을때 좀더 편하게 동일한 작업을 할 수 있습니다.
import pickle

with open("profile.pickle", "rb") as profile_file: # 파일 읽기
    print(pickle.load(profile_file))

with open("study.txt", "w", encoding="utf8") as study_file: # 파일생성
    study_file.write("파이썬을 열심히 공부하고 있어요")

with open("study.txt", "r", encoding="utf8") as study_file: # 파일읽기
    print(study_file.read())

8-6. 퀴즈 #7
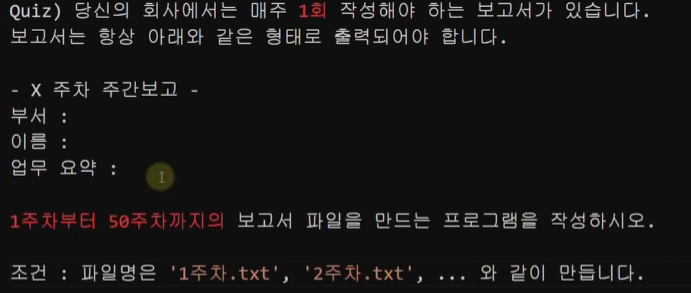
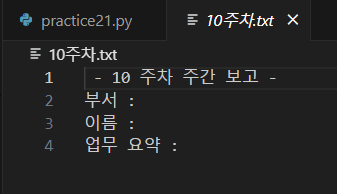
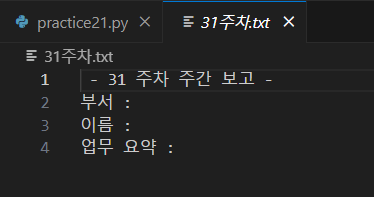
1주차 부터 50주차 까지 파일을 만들려면
반복문을 사용하고, 파일을 쓰기전용으로 프로그램을 만들어야겠군요
for number in range(1, 51):
    with open("{0}주차.txt".format(number), "w", encoding="utf8") as report:
        report.write(" - {0} 주차 주간 보고 -\n부서 : \n이름 : \n업무 요약 : ".format(number))
report.close()

9-1. 클래스
스타크래프트 유닛을 만든다고 가정하고 클래스를 사용 안하고 만들어보면
name = "마린"
hp = 40
damage = 5

print("{0} 유닛이 생성되었습니다.".format(name))
print("체력 {0}, 공격력 {1}\n".format(hp, damage))

tank_name = "탱크"
tank_hp = 150
tank_damage = 35

print("{0} 유닛이 생성되었습니다.".format(tank_name))
print("체력 {0}, 공격력 {1}\n".format(tank_hp,tank_damage))

def attack(name, location, damage):
    print("{0} : {1} 방향으로 적군을 공격 합니다. [공격력 {2}]".format(name,location,damage))


attack(name, "1시", damage)
attack(tank_name, "1시", tank_damage)
만들수는 있는데, 너무 까다롭고 힘듭니다.
그래서 클래스를 사용합니다.
보통 클래스는 붕어빵틀 이라고 생각하면 쉽게 이해할 수 있습니다.
일반적으로는 서로 연관되어있는 변수와 함수의 집합
9-2. __int__
클래스를 만드는법
class 클래스이름:
def __init__(self,원하는변수이름):
self.원하는변수이름 = 원하는변수이름
클래스 쓰는법
이름 = 클래스이름(위에서 정해줬던 변수에 해당하는 값)
__init__ -> 이닛함수는 파이썬에서 쓰이는 생성자입니다.
자동으로 호출되는 부분
클래스로부터 만들어지는 애들을 객체라고 합니다.
class Unit:
    def __init__(self, name, hp, damage):
        self.name = name
        self.hp = hp
        self.damage = damage
        print("{0} 유닛이 생성되었습니다.".format(self.name))
        print("체력 {0}, 공격력 {1}".format(self.hp,self.damage))


marine1 = Unit("마린", 40, 5) # 3가지 값을 제대로 안넣으면 에러 발생
marine2 = Unit("마린", 40, 5)
tank = Unit("탱크", 40, 5)
9-3. 맴버변수
class Unit:
    def __init__(self, name, hp, damage):
        self.name = name
        self.hp = hp
        self.damage = damage
        print("{0} 유닛이 생성되었습니다.".format(self.name))
        print("체력 {0}, 공격력 {1}".format(self.hp,self.damage))

wraith1 = Unit("레이스", 80, 5)
print("유닛 이름 : {0}, 공격력 : {1}".format(wraith1.name, wraith1.damage))


# 마인드 컨트롤
wraith2 = Unit("빼앗은 레이스", 80, 5)
wraith2.clocking = True # 이런식으로 어떤 객체에 추가로 변수를 외부에서 만들어서 쓸 수도 있다.

# 클래스 외부에서 내가 원하는 어떤 변수에 대해서 확장이 가능하고
# 확장된 변수는 내가 확장을 한 객체에 대해서만 적용이 되고
# 기존에 있던 다른 객체에는 적용이 X

if wraith2.clocking == True:
    print("{0} 는 현재 클로킹 상태입니다.".format(wraith2.name))
9-4. 메소드
메소드는 클래스의 기능과 같은 역할을 합니다.
메소드 특징
1. 여러 개의 메소드를 정의할 수 있습니다.
2. 클래스 안에서 매소드 앞에서는 항상 self를 무조건 적어줍니다.
class Unit:
    def __init__(self, name, hp, damage):
        self.name = name
        self.hp = hp
        self.damage = damage
        print("{0} 유닛이 생성 되었습니다.".format(self.name))
        print("체력 {0}, 공격력 {1}".format(self.hp, self.damage))
# 공격 유닛
class AttackUnit:
    def __init__(self, name, hp, damage):
        self.name = name
        self.hp = hp
        self.damage = damage

    def attack(self, location):
        print("{0} : {1} 방향으로 적군을 공격 합니다. [공격력 : {2}]"\
              .format(self.name,location, self.damage))


    def damaged(self, damage):
        print("{0} : {1} 데미지를 입었습니다.".format(self.name, damage))
        self.hp -= damage
        print("{0} : 현재 체력은 {1} 입니다.".format(self.name, self.hp))
        if self.hp <= 0:
            print("{0} : 파괴되었습니다.".format(self.name))

firebat1 = AttackUnit("파이어뱃", 50, 16)
firebat1.attack("5시")

firebat1.damaged(25)
firebat1.damaged(25)
9-5. 상속
상속이란 말 그대로 물려받는다 라는 뜻입니다.
class Unit:
    def __init__(self, name, hp):
        self.name = name
        self.hp = hp

# 공격 유닛
class AttackUnit(Unit): # AttackUnit은 Unit을 상속받아서 만들어짐
    def __init__(self, name, hp, damage):
        Unit.__init__(self,name,hp)
        self.damage = damage

    def attack(self, location):
        print("{0} : {1} 방향으로 적군을 공격 합니다. [공격력 : {2}]"\
              .format(self.name,location, self.damage))


    def damaged(self, damage):
        print("{0} : {1} 데미지를 입었습니다.".format(self.name, damage))
        self.hp -= damage
        print("{0} : 현재 체력은 {1} 입니다.".format(self.name, self.hp))
        if self.hp <= 0:
            print("{0} : 파괴되었습니다.".format(self.name))

firebat1 = AttackUnit("파이어뱃", 50, 16)
firebat1.attack("5시")

firebat1.damaged(25)
firebat1.damaged(25)
9-6. 다중 상속
다중상속을 하는법은
class FlyableAttackUnit(AttackUnit, Flyable): > 상속받을 클래스를 콤마로 지정하면됩니다.
class Unit:
    def __init__(self, name, hp):
        self.name = name
        self.hp = hp

# 공격 유닛
class AttackUnit(Unit):
    def __init__(self, name, hp, damage):
        Unit.__init__(self,name,hp)
        self.damage = damage

    def attack(self, location):
        print("{0} : {1} 방향으로 적군을 공격 합니다. [공격력 : {2}]"\
              .format(self.name,location, self.damage))


    def damaged(self, damage):
        print("{0} : {1} 데미지를 입었습니다.".format(self.name, damage))
        self.hp -= damage
        print("{0} : 현재 체력은 {1} 입니다.".format(self.name, self.hp))
        if self.hp <= 0:
            print("{0} : 파괴되었습니다.".format(self.name))

class Flyable:
    def __init__(self, flying_speed):
        self.flying_speed = flying_speed

    def fly(self, name, location):
        print("{0} : {1} 방향으로 날아갑니다. [속도 {2}]"\
              .format(name, location, self.flying_speed))


class FlyableAttackUnit(AttackUnit, Flyable):
    def __init__(self, name, hp, damage, flying_speed):
        AttackUnit.__init__(self, name, hp, damage)
        Flyable.__init__(self, flying_speed)


valkyrie = FlyableAttackUnit("발키리", 200, 6, 5)
valkyrie.fly(valkyrie.name,"3시")
9-7. 메소드 오버라이딩
자식클래스에서 메소드를 쓰고싶을때
메소드를 새롭게 정의해서 사용할 수 있는게 메소드 오버라이딩이라고 합니다.
class Unit:
    def __init__(self, name, hp, speed):
        self.name = name
        self.hp = hp
        self.speed = speed

    def move(self, location):
        print("{0} : {1} 방향으로 이동합니다. [속도 {2}]"\
              .format(self.name,location,self.speed))
# 공격 유닛
class AttackUnit(Unit):
    def __init__(self, name, hp, speed,damage):
        Unit.__init__(self,name,hp,speed)
        self.damage = damage

    def move(self, location):
        print("[지상 유닛 이동]")
        print("{0} : {1} 방향으로 이동합니다. [속도 {2}]"\
              .format(self.name,location,self.speed))

class Flyable:
    def __init__(self, flying_speed):
        self.flying_speed = flying_speed

    def fly(self, name, location):
        print("{0} : {1} 방향으로 날아갑니다. [속도 {2}]"\
              .format(name, location, self.flying_speed))

class FlyableAttackUnit(AttackUnit, Flyable):
    def __init__(self, name, hp, damage, flying_speed):
        AttackUnit.__init__(self, name, hp, 0,damage)
        # 지상 speed 0
        Flyable.__init__(self, flying_speed)
    def move(self, location): # move라는 함수를 새롭게 정의함.
        print("[공중 유닛 이동]")
        self.fly(self.name,location)

vulture = AttackUnit("벌쳐",80,10,20)

battlecruiser = FlyableAttackUnit("배틀크루저",500,25,3)

vulture.move("11시")
battlecruiser.move("9시")
9-8. pass
pass의 의미는 아무것도 하지 않고 일단 넘어간다는 의미
보통 그냥 넘어갈때 사용합니다.
# 일반 유닛
class Unit:
    def __init__(self, name, hp, speed):
        self.name = name
        self.hp = hp
        self.speed = speed

    def move(self, location):
        print("{0} : {1} 방향으로 이동합니다. [속도 {2}]"\
              .format(self.name,location,self.speed))
# 공격 유닛
class AttackUnit(Unit):
    def __init__(self, name, hp, speed,damage):
        Unit.__init__(self,name,hp,speed)
        self.damage = damage

    def move(self, location):
        print("[지상 유닛 이동]")
        print("{0} : {1} 방향으로 이동합니다. [속도 {2}]"\
              .format(self.name,location,self.speed))
# 날 수 있는 공중 클래스
class Flyable:
    def __init__(self, flying_speed):
        self.flying_speed = flying_speed

    def fly(self, name, location):
        print("{0} : {1} 방향으로 날아갑니다. [속도 {2}]"\
              .format(name, location, self.flying_speed))

# 공중 공격 유닛
class FlyableAttackUnit(AttackUnit, Flyable):
    def __init__(self, name, hp, damage, flying_speed):
        AttackUnit.__init__(self, name, hp, 0,damage)
        # 지상 speed 0
        Flyable.__init__(self, flying_speed)
    def move(self, location): # move라는 함수를 새롭게 정의함.
        print("[공중 유닛 이동]")
        self.fly(self.name,location)

# 건물
class BuildingUnit(Unit):
    def __init__(self, name, hp, location):
        pass

supply_depot = BuildingUnit("서플라이 디폿", 500, "7시")

def game_start():
    print("[알림] 새로운 게임을 시작합니다.")

def game_over():
    pass

game_start()
game_over()
9-9. super
super를 사용할때는 super().__init__(name,hp,0) super앞에()를 붙이고 self는 안들어갑니다.
그리고 super를 사용하면 다중상속할때 문제가 생기므로 다중상속할때는 사용 x
class Unit:
    def __init__(self):
        print("Unit 생성자")

class Flyable:
    def __init__(self):
        print("Flyable 생성자")

class FlyableUnit(Unit, Flyable):
    def __init__(self):
        super().__init__()

dropship = FlyableUnit()
class Unit:
    def __init__(self):
        print("Unit 생성자")

class Flyable:
    def __init__(self):
        print("Flyable 생성자")

class FlyableUnit(Flyable,Unit):
    def __init__(self):
        super().__init__()

dropship = FlyableUnit()
두개이상의 부모클래스를 다중상속받을때는
super 를 쓰면 순서 상에 맨 처음 상속받는 클래스에 대해서만 init 함수가 호출됩니다.
class Unit:
    def __init__(self):
        print("Unit 생성자")

class Flyable:
    def __init__(self):
        print("Flyable 생성자")

class FlyableUnit(Flyable,Unit):
    def __init__(self):
        # super().__init__()
        Unit.__init__(self)
        Flyable.__init__(self)

dropship = FlyableUnit()
super().__init__() > x
Unit.__init__(self) > o
Flyable.__init__(self) > o

9-10.스타크래프트 프로젝트 전반전 , 9-11.스타크래프트 프로젝트 후반전
from random import *

# 일반 유닛
class Unit:
    def __init__(self, name, hp, speed):
        self.name = name
        self.hp = hp
        self.speed = speed
        print("{0} 유닛이 생성되었습니다.".format(name))

    def move(self, location):
        print("{0} : {1} 방향으로 이동합니다. [속도 {2}]"\
              .format(self.name,location,self.speed))

    def damaged(self, damage):
        print("{0} : {1} 데미지를 입었습니다.".format(self.name, damage))
        self.hp -= damage
        print("{0} : 현재 체력은 {1} 입니다.".format(self.name, self.hp))
        if self.hp <= 0:
            print("{0} : 파괴되었습니다.".format(self.name))

# 공격 유닛
class AttackUnit(Unit):
    def __init__(self, name, hp, speed, damage):
        Unit.__init__(self, name, hp, speed)
        self.damage = damage

    def attack(self, location):
        print("{0} : {1} 방향으로 적군을 공격 합니다. [공격력 : {2}]"\
              .format(self.name,location, self.damage))
# 마린
class Marine(AttackUnit):
    def __init__(self):
        AttackUnit.__init__(self,"마린",40,1,5)
    # 스팀팩

    def stimpack(self):
        if self.hp > 10:
            self.hp -= 10
            print("{0} : 스팀팩을 사용합니다. (HP 10 감소)".format(self.name))
        else:
            print("{0} : 체력이 부족하여 스팀팩을 사용하지 않습니다.".format(self.name))

# 탱크
class Tank(AttackUnit):

    seize_developed = False # 시즈모드 개발여부

    def __init__(self):
        AttackUnit.__init__(self, "탱크", 150,1,35)
        self.seize_mode = False

    def set_seize_mode(self):
        if Tank.seize_developed == False:
            return
        # 현재 시즈모드가 아닐 때 -> 시즈모드
        if self.seize_mode == False:
            print("{0} : 시즈모드로 전환합니다.".format(self.name))
            self.damage *= 2
            self.seize_mode = True
        # 현재 시즈모드일 때 -> 시즈모드 해제
        else:
            print("{0} : 시즈모드를 해제합니다.".format(self.name))
            self.damage /= 2
            self.seize_mode = False


# 날 수 있는 기능을 가진 클래스
class Flyable:
    def __init__(self, flying_speed):
        self.flying_speed = flying_speed

    def fly(self, name, location):
        print("{0} : {1} 방향으로 날아갑니다. [속도 {2}]"\
              .format(name, location, self.flying_speed))

# 공중 공격 유닛 클래스
class FlyableAttackUnit(AttackUnit, Flyable):
    def __init__(self, name, hp, damage, flying_speed):
        AttackUnit.__init__(self, name, hp, 0,damage)
        # 지상 speed 0
        Flyable.__init__(self, flying_speed)
    def move(self, location):
        self.fly(self.name,location)

# 레이스

class Wraith(FlyableAttackUnit):
    def __init__(self):
        FlyableAttackUnit.__init__(self,"레이스",80,20,5)
        self.clocked = False # 클로킹 모드 (해제 상태)

    def clocking(self):
        if self.clocked == True: # 클로킹 모드 -> 모드 해제
            print("{0} : 클로킹 모드 해제합니다.".format(self.name))
            self.clocked = False
        else: # 클로킹 모드 -> 모드 해제
            print("{0} : 클로킹 모드 설정합니다.".format(self.name))
            self.clocked = True


def game_start():
    print("[알림] 새로운 게임을 시작합니다.")

def game_over():
    print("Player : gg")
    print("[Player] 님이 게임에서 퇴장하셨습니다.")

# 실제 게임 진행

game_start()

# 마린 3기 생성
m1 = Marine()
m2 = Marine()
m3 = Marine()

# 탱크 2기 생성
t1 = Tank()
t2 = Tank()

# 레이스 1기 생성
w1 = Wraith()

# 유닛 일괄 관리
attack_units = []
attack_units.append(m1)
attack_units.append(m2)
attack_units.append(m3)
attack_units.append(t1)
attack_units.append(t2)
attack_units.append(w1)

# 전군 이동
for unit in attack_units:
    unit.move("1시")

# 탱크 시즈모드 개발
Tank.seize_developed = True
print("[알림] 탱크 시즈 모드 개발이 완료되었습니다.")

# 공격 모드 준비 (마린 : 스팀팩, 탱크 : 시즈모드, 레이스 : 클로킹)
for unit in attack_units:
    if isinstance(unit, Marine):
        unit.stimpack()
    elif isinstance(unit, Tank):
        unit.set_seize_mode()
    elif isinstance(unit, Wraith):
        unit.clocking()

# 전군 공격

for unit in attack_units:
    unit.attack("1시")

for unit in attack_units:
    unit.damaged(randint(5, 20)) # 공격은 랜덤으로 받음 (5 ~ 20)

# 게임 종료

game_over()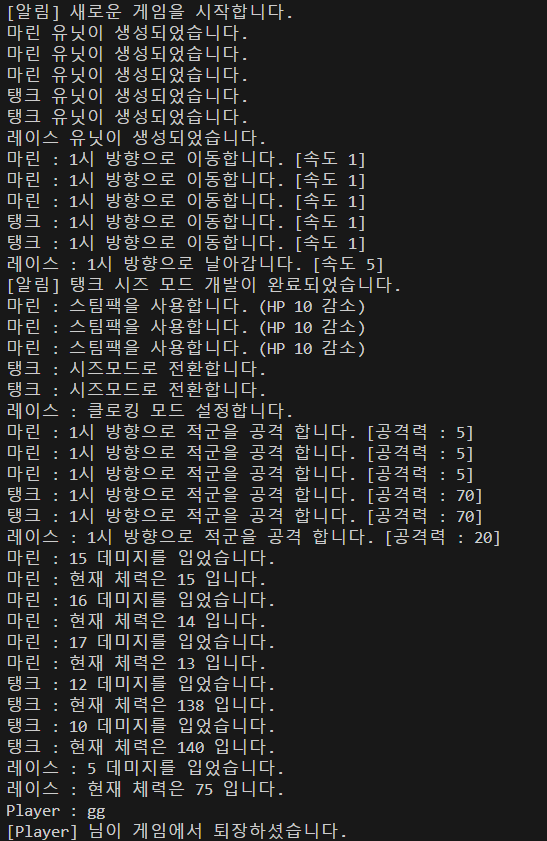
9-12. 퀴즈 #8


우선, 코드가 주어졌습니다.
그리고 출력 예제를 보면
총 3대 즉, 매물의 갯수를 세줘야 합니다.
이 매물들을 한번에 묶어주는게 필요합니다.
class House:
    def __init__(self,location,house_type,deal_type,price,completion_year):
        self.location = location
        self.house_type = house_type
        self.deal_type = deal_type
        self.price = price
        self.completion_year = completion_year

    def show_detail(self):
        print("{0} {1} {2} {3} {4}년".format(self.location,self.house_type,self.deal_type,self.price,self.completion_year))
        pass

class Apartment(House):
    def __init__(self):
        House.__init__(self,"강남","아파트","매매","10억","2010")

class Officetel(House):
    def __init__(self):
        House.__init__(self,"마포","오피스텔","전세","5억","2007")

class Villa(House):
    def __init__(self):
        House.__init__(self,"송파","빌라","월세","500/50","2000")

a1 = Apartment()
a2 = Officetel()
a3 = Villa()

b = [a1,a2,a3]

print("총 {0}대의 매물이 있습니다.".format(len(b)))
a1.show_detail()
a2.show_detail()
a3.show_detail()
10-1. 예외처리
쓰는 방법
try:
코드내용
except 예외이름:
에러가 발생시 처리하는 코드
try:
    print("나누기 전용 계산기입니다.")
    nums = []
    nums.append(int(input("첫 번째 숫자를 입력하세요 : ")))
    nums.append(int(input("두 번째 숫자를 입력하세요 : ")))
    #nums.append(int(nums[0] / nums[1]))
    print("{0} / {1} = {2}".format(nums[0], nums[1], nums[2]))
except ValueError: # 값이 에러일때 (숫자를 넣어야하는데 문자열을 넣을때)
    print("에러가 발생했습니다. 잘못된 값을 입력하셨습니다.")
except ZeroDivisionError as err: # 숫자를 0으로 나눴을때 에러가 발생하면 실행
    print(err)
except Exception as err: # 모든 예외 에러 메세지를 출력할때
    print("알 수 없는 에러가 발생하였습니다.")
    print(err)


10-2. 에러 발생시키기
일부로 에러를 발생시키는 방법은
raise를 사용하는 방법이 있습니다.
try:
    print("한 자리 숫자 나누기 전용 계산기입니다.")
    num1 = int(input("첫 번째 숫자를 입력하세요 : "))
    num2 = int(input("첫 번째 숫자를 입력하세요 : "))
    if num1 >= 10 or num2 >= 10:
        raise ValueError
    print("{0} / {1} = {2}".format(num1, num2, int(num1/num2)))
except ValueError:
    print("잘못된 값을 입력하였습니다. 한 자리 숫자만 입력하세요.")
10-3. 사용자 정의 예외처리
파이썬에서 제공하는 에러 말고
직접 정의해서 에러를 만들수도있습니다.
class BigNumberError(Exception): # 직접 정의 Exception상속
    def __init__(self, msg):
        self.msg = msg

    def __str__(self):
        return self.msg

try:
    print("한 자리 숫자 나누기 전용 계산기입니다.")
    num1 = int(input("첫 번째 숫자를 입력하세요 : "))
    num2 = int(input("첫 번째 숫자를 입력하세요 : "))
    if num1 >= 10 or num2 >= 10:
        raise BigNumberError("입력값 : {0}, {1}".format(num1,num2))
    print("{0} / {1} = {2}".format(num1, num2, int(num1/num2)))
except ValueError:
    print("잘못된 값을 입력하였습니다. 한 자리 숫자만 입력하세요.")
except BigNumberError as err:
    print("에러가 발생하였습니다. 한 자리 숫자만 입력하세요.")
    print(err)
10-4. finally
finally는 에러가 발생하든 잘 실행되든 마지막에 무조건적으로 나오는걸 뜻합니다.
class BigNumberError(Exception):
    def __init__(self, msg):
        self.msg = msg

    def __str__(self):
        return self.msg

try:
    print("한 자리 숫자 나누기 전용 계산기입니다.")
    num1 = int(input("첫 번째 숫자를 입력하세요 : "))
    num2 = int(input("첫 번째 숫자를 입력하세요 : "))
    if num1 >= 10 or num2 >= 10:
        raise BigNumberError("입력값 : {0}, {1}".format(num1,num2))
    print("{0} / {1} = {2}".format(num1, num2, int(num1/num2)))
except ValueError:
    print("잘못된 값을 입력하였습니다. 한 자리 숫자만 입력하세요.")
except BigNumberError as err:
    print("에러가 발생하였습니다. 한 자리 숫자만 입력하세요.")
    print(err)
finally: # 무조건 출력
    print("계산기를 이용해 주셔서 감사합니다.")

프로그램이 강제 종료되는걸 막음으로써 프로그램의 완성도를 높일 수 있습니다.
10-5. 퀴즈 #9


class SoldOutError(Exception): # SoldOutError 라는 사용자 정의 에러 생성
    pass

chicken = 10
waiting = 1
while(True):
    try:
        print("[남은 치킨 : {0}]".format(chicken))
        order = int(input("치킨 몇 마리 주문하시겠습니까?")) # 치킨을 입력 받음
        if order > chicken: # 만약 주문한 치킨이 남은 치킨보다 많으면
            print("재료가 부족합니다.")
        elif order <= 0: # 주문한 치킨이 1보다 작으면
            raise ValueError
        else:
            print("[대기번호 {0}] {1} 마리 주문이 완료되었습니다.".format(waiting, order))
            waiting += 1
            chicken -= order
        if chicken == 0: # 치킨 소진
            raise SoldOutError # 사용자 정의 에러 실행
    except ValueError:
        print("잘못된 값을 입력하셨습니다.")
    except SoldOutError:
        print("재고가 소진되어 더 이상 주문을 받지 않습니다.")
        break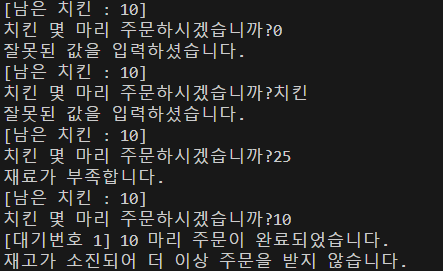
11-1. 모듈
함수 정의나 클래스등의 파이썬 문장들을 담고 있는 파일을 모듈이라고 합니다.
모듈은 확장자가 .py 입니다.
theater_module.py 라는 파일을 만듭니다.
# 일반 가격
def price(people):
    print("{0}명 가격은 {1}원 입니다.".format(people, people * 10000))

# 조조 할인 가격
def price_morning(people):
    print("{0}명 조조 할인 가격은 {1}원 입니다.".format(people, people * 6000))

# 군인 할인 가격
def price_soldier(people):
    print("{0}명 군인 할인 가격은 {1}원 입니다.".format(people, people * 4000))
모듈을 사용할때는
import 모듈이름 을 써주면 됩니다.
import theater_module

theater_module.price(3) # 3명이서 영화 보러 감
theater_module.price_morning(4) # 4명이서 조조할인 보러 감
theater_module.price_soldier(5) # 5명의 군인이 영화 보러 감
그런데, 모듈명이 좀 깁니다.
줄여볼까요?
import theater_module as mv

mv.price(3)
mv.price_morning(4)
mv.price_soldier(5)
별명을 통해 모듈을 줄일 수 있습니다.
더 줄이는것도 가능합니다.
from theater_module import *

price(3)
price_morning(4)
price_soldier(5)
또 원하는 함수만 import를 할 수도 있습니다.
from theater_module import price, price_morning
price(5)
price_morning(6)
# price_soldier(7) # price_soldier는 모름
마지막으로 이렇게도 사용 가능합니다.
from theater_module import price_soldier as price
price(5) # price_soldier의 내용을 price로 사용
11-2. 패키지
모듈들을 모아놓은 집합을 패키지라고 합니다.
모듈은 파일 , 패키지는 폴더 라고 생각할수 있습니다.
travel 이라는 폴더를 생성하고
그안에 여러 나라의 패키지 상품을 넣어 보겠습니다.
# thailand.py
class ThailandPackage:
    def detail(self):
        print("[태국 패키지 3박 5일] 방콕, 파타야 여행 (야시장 투어) 50만원")
# vietnam.py
class VietnamPackage:
def detail(self):
print("[베트남 패키지 3박 5일] 다낭 효도 여행 60만원")import travel.thailand # travel 안에있는 thailand 사용
trip_to = travel.thailand.ThailandPackage()
trip_to.detail()
import를 쓸때 모듈이나 패키지만 가능합니다. 함수나 클래스는 불가능
즉,
import travel.thailand.ThailandPackage() # 에러이렇게 사용이 불가능 하다는 소리입니다.
가만 from import 구문에서는 사용 가능합니다.
from travel.thailand import ThailandPackage
trip_to = ThailandPackage()
trip_to.detail()
태국 말고 베트남을 출력해보겠습니다.
from travel import vietnam
trip_to = vietnam.VietnamPackage()
trip_to.detail()
11-3. __all__
from travel import *를 사용해 모듈을 가져오는 방법
# __init__.py 라는 파일 생성
__all__ = ["vietnam", "thailand"] # vietnam,thailand 모듈 공개
from travel import *
trip_to = thailand.ThailandPackage()
trip_to.detail()
11-4. 모듈 직접 실행
class ThailandPackage:
    def detail(self):
        print("[태국 패키지 3박 5일] 방콕, 파타야 여행 (야시장 투어) 50만원")

# 이 name이 이 "name"이면
if __name__ == "__main__":
    print("Thailand 모듈을 직접 실행")
    print("이 문장은 모듈을 직접 실행할 때만 실행돼요.")
    trip_to = ThailandPackage()
    trip_to.detail()
else:
    print("Thailand 외부에서 모듈 호출")
모듈을 이 파일 안에서 실행했냐 밖에서 실행했냐를 알려주는 코드입니다.


11-5. 패키지,모듈위치
위치(경로)를 알고싶을때는
import inspect 을 시켜준뒤
print(inspect.getfile(알고싶은파일))
from travel import *
import inspect
import random # random의 위치를 알고싶을 때

print(inspect.getfile(random))
print(inspect.getfile(thailand))
11-6. pip install
여기에 들어가면 다른사람이 만들어놓은 패키지를 다운로드 하고 사용할 수 있습니다.
PyPI · The Python Package Index
The Python Package Index (PyPI) is a repository of software for the Python programming language.
pypi.org
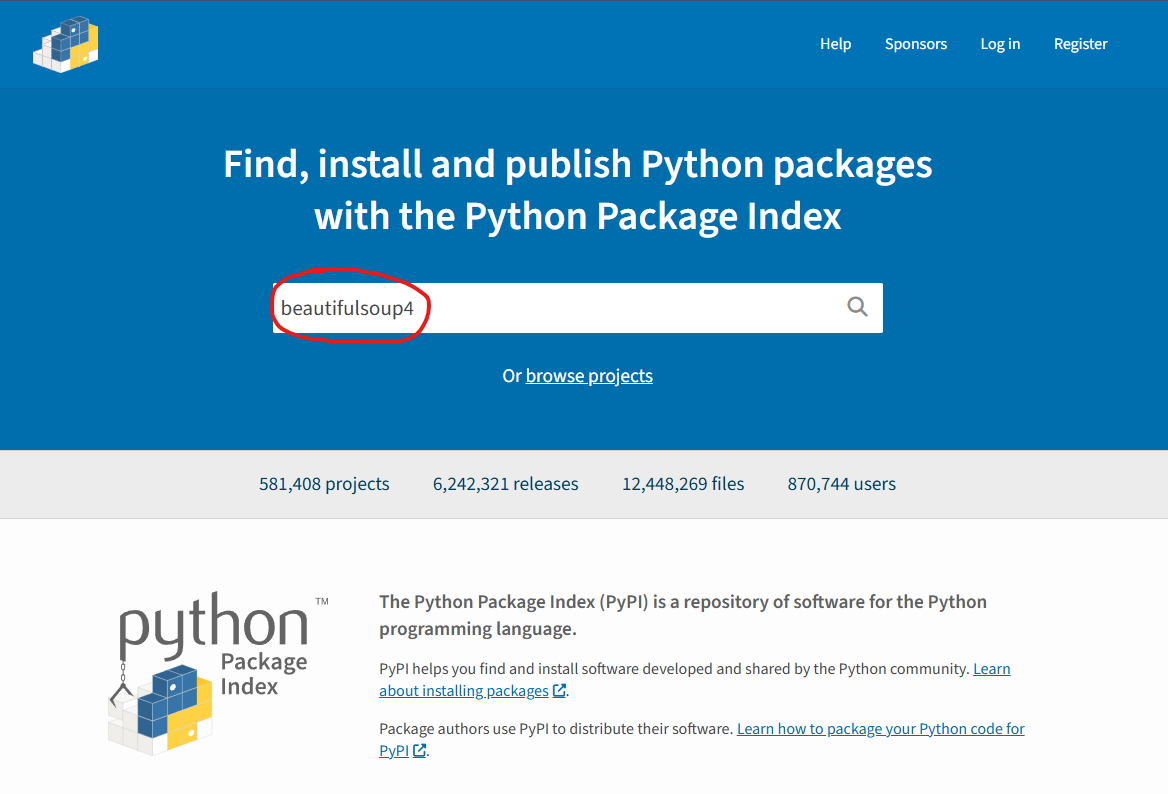
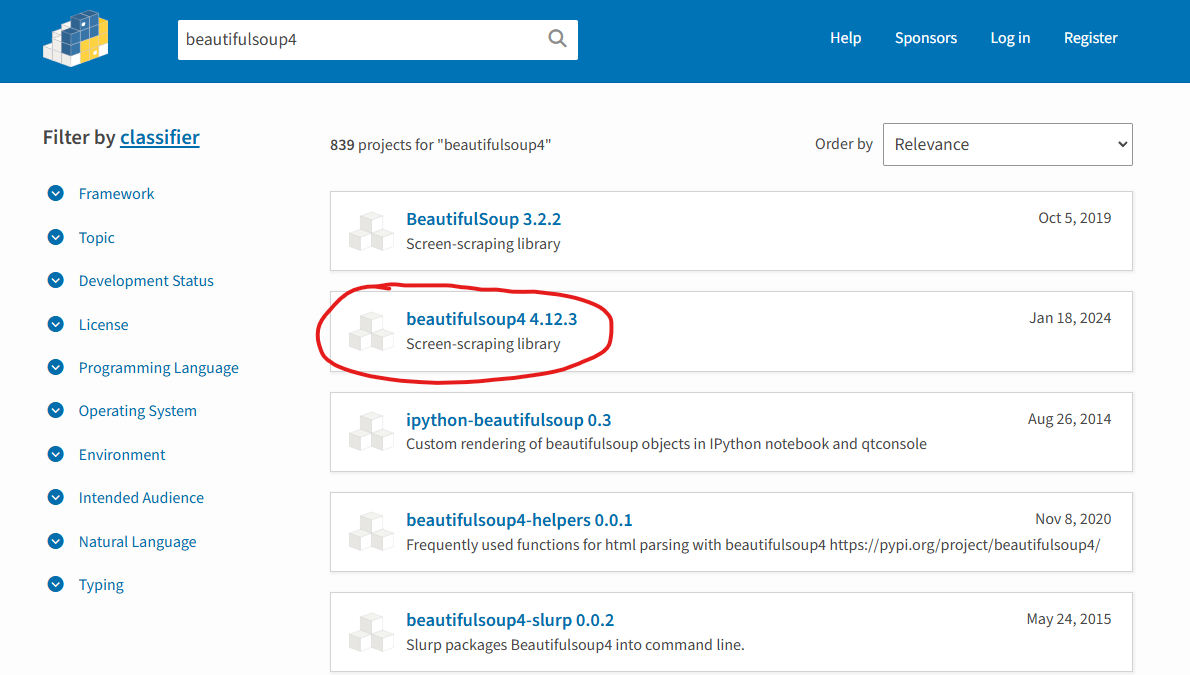
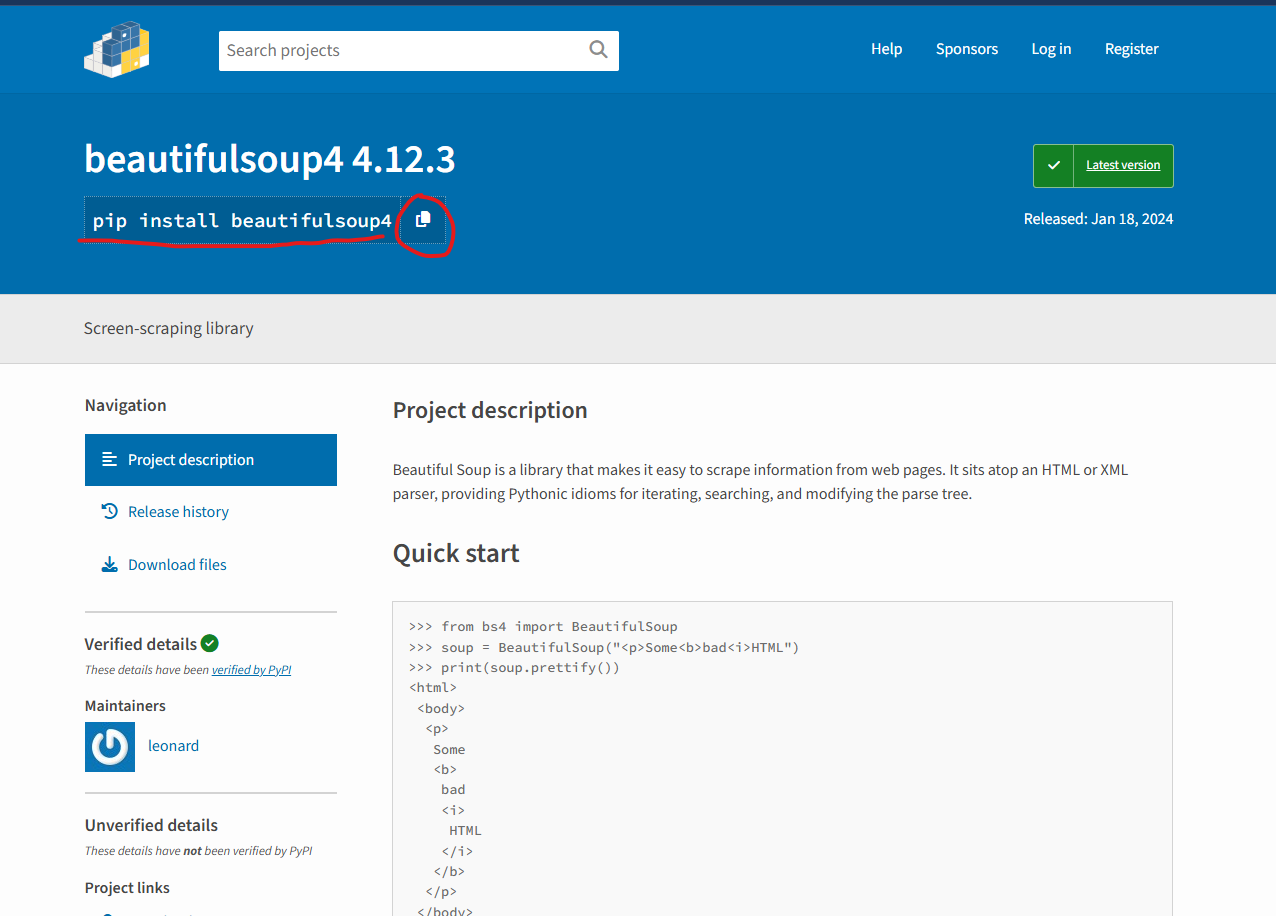
비주얼 스튜디오 코드 터미널 쪽에
"pip install beautifulsoup4" 를 붙여넣습니다.

시간이 조금 지나면 설치가 완료됩니다.
그러면 이제 사용을 한번 해봅시다.
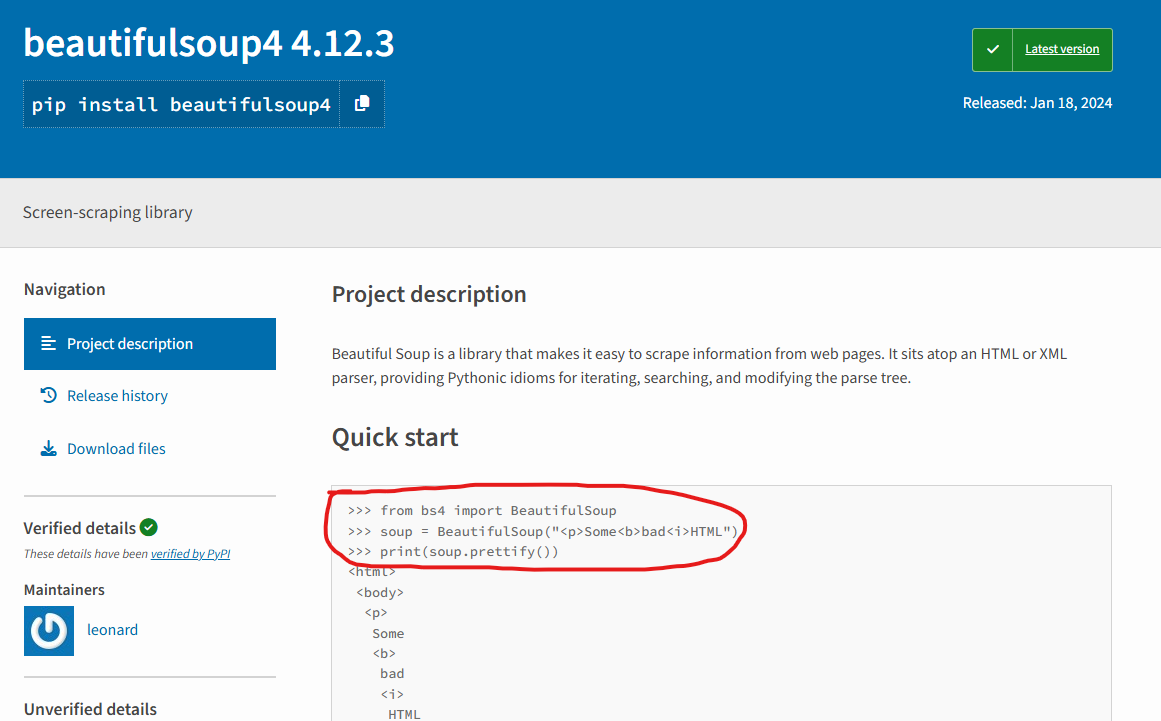
from bs4 import BeautifulSoup
soup = BeautifulSoup("<p>Some<b>bad<i>HTML")
print(soup.prettify())
그리고 pip list를 사용하면 현제 컴퓨터에 설치되어있는 패키지를 볼 수 있습니다.

그리고 pip show 패키지이름 을 사용하면 그 패키지에 대한 정보를 알려줍니다.

업그레이드도 할 수 있습니다.
pip install --upgrade 패키지이름

마지막으로 패키지를 삭제하는 방법은
pip uninstall 패키지이름 을 사용하면 됩니다.


11.7- 내장함수
내장함수란, 말 그대로 내장되어있기 때문에 바로 사용 가능한 함수를 말합니다.
앞에서 써봤던 input이 있겠군요.
# input : 사용자 입력을 받는 함수

languaage = input("무슨 언어를 좋아하세요?")
print("{0}은 아주 좋은 언어입니다!".format(languaage))

# dir : 어떤 객체를 넘겨줬을 때 그 객체가 어떤 변수와 함수를 가지고 있는지 표시
print(dir())
import random
print(dir())
import pickle
print(dir())

print(dir(random)) # random내에서 쓸 수 있는 모듈
https://docs.python.org/3/library/functions.html
Built-in Functions
The Python interpreter has a number of functions and types built into it that are always available. They are listed here in alphabetical order.,,,, Built-in Functions,,, A, abs(), aiter(), all(), a...
docs.python.org
여기에 들어가보시면


파이썬 내에서 쓸 수 있는 다양한 내장 함수가 나옵니다.
11-8. 외장함수
외장 함수는 내장 함수와 다르게 import를 해줘야 쓸 수 있는 함수를 말합니다.
https://docs.python.org/3/py-modindex.html
Python Module Index — Python 3.13.0 documentation
numbers Numeric abstract base classes (Complex, Real, Integral, etc.).
docs.python.org
여기에 들어가면
사용할 수 있는 외장 함수를 볼 수 있습니다.
glob : 경로 내의 폴더 / 파일 목록 조회 (윈도우 dir)
import glob
print(glob.glob("*.py")) # 확장자가 py 인 모든 파일
제가 연습하는 코드파일은 따로 빼놔서 한개밖에 안나옵니다.
os : 운영체제에서 제공하는 기본 기능
import os
print(os.getcwd()) # 현재 디렉토리

folder = "sample_dir"

# 파일이 이미 있으면 삭제하고
# 없으면 새로 만드는 코드
if os.path.exists(folder):
     print("이미 존재하는 폴더입니다.")
     os.rmdir(folder)
     print(folder, "폴더를 삭제하였습니다.")
else:
     os.makedirs(folder) # 폴더 생성
     print(folder, "폴더를 생성하였습니다.")


print(os.listdir()) # 경로 안에있는 파일을 출력


time : 시간 관련 함수
import time

print(time.localtime())
print(time.strftime("%Y-%m-%d %H:%M:%S"))

import datetime

print("오늘 날짜는 ",datetime.datetime.today())

# timedelta : 두 날짜 사이의 간격

today = datetime.date.today() # 오늘 날짜 저장
td = datetime.timedelta(days=100) # 100일 저장
print("우리가 만난지 100일은",today + td) # 오늘붙터 100일 후
11-9. 퀴즈 #9

# byme.py 파일 생성 후 코드 작성
def sign():
    print("이 프로그램은 나도코딩에 의해 만들어졌습니다.")
    print("유튜브 : youtube.com")
    print("구글 : gloogle.com")
import byme
byme.sign()
'Python' 카테고리의 다른 글
| Python(7) 활용2 (0) | 2024.11.05 |
|---|---|
| Python(6) 활용1 (0) | 2024.11.04 |
| Python(4) 반복문과 함수 (0) | 2024.11.02 |
| Python(3) 문자열 , 자료구조 (0) | 2024.11.01 |
| Python(2) 파이썬 숫자 (0) | 2024.10.31 |